|
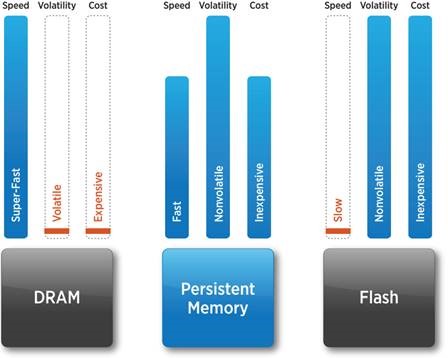
It's that time again, to begin the process, that probably should have been started a while ago, which is upgrading your virtual infrastructure to vSphere 6.7. The end of general support for vSphere 6.0 is March 12, 2020, and if you are on an earlier version of vSphere, then you are currently running an unsupported version of vSphere and may also need to purchase to new hardware to support the latest version. I would like to begin this blog with some of the stated benefits to upgrading your environment. BenefitsThe new vSphere 6.7, vCenter appliance delivers major performance improvements from previous versions. First, vCenter Server has 2x faster performance in operations per second. This means better response times for the daily tasks you perform. There is a 3x reduction in memory usage and also 3x faster operations relating to VMware vSphere Distributed Resource Scheduler. If you would like more detail on these improvements, you can find the details in this blog by VMware. New Features and EnhancementsThere are a lot of great new features and enhancements in the latest version of vSphere and if you are still on and older version than vSphere 6, then there are even more that came with vSphere 6.7. Below is a list of new features relating to vSphere 6.7. vSphere Quick Boot vSphere Quick Boot innovation restarts the ESXi hypervisor without rebooting the physical host, skipping time-consuming hardware initialization. Trusted Platform Module (TPM) 2.0 vSphere 6.7 adds support for Trusted Platform Module (TPM) 2.0 hardware devices for ESXi hosts and also introduces virtual TPM (vTPM) 2.0 for VMs, significantly enhancing protection and ensuring integrity for both the hypervisor and the guest operating system (OS). This capability helps prevent VMs and hosts from being tampered with. For virtual machines, vTPM 2.0 gives VMs the ability to use enhanced guest OS security features sought by security teams. Encrypted vMotion vSphere 6.7 also improves protection for data in motion by enabling Encrypted vMotion across various vCenter Server instances as well as versions. This makes it easy to securely conduct data center migrations or to move data across a hybrid cloud environment—that is, between on-premises and public cloud—or across geographically distributed data centers. Microsoft Virtualization-Based Security (VBS) vSphere 6.7 introduces support for the entire range of Microsoft virtualization-based security technologies introduced in Windows 10 and Windows Server 2016. In 2015, Microsoft introduced virtualization-based security (VBS). We have worked very closely with Microsoft to provide support for these features in vSphere 6.7. vSphere Persistent Memory vSphere Persistent Memory, administrators using supported hardware modules such as those available from Dell EMC and Hewlett Packard Enterprise can leverage them either as super-fast storage with high IOPS or expose them to the guest OS as nonvolatile memory (NVM). vCenter Server Hybrid Linked Mode vSphere 6.7 introduces vCenter Server Hybrid Linked Mode, which enables users to have unified visibility and manageability across an on-premises vSphere environment running on one version and a public cloud environment based on the vSphere platform, such as VMware Cloud on AWS, running on a different vSphere version. Per-VM Enhanced vMotion Compatibility (EVC) vSphere 6.7 introduces per-VM Enhanced vMotion Compatibility (EVC), a key capability for the hybrid cloud that enables the EVC mode to become an attribute of the VM rather than of the specific processor generation it is booted on in the cluster. Simplification of the architecture One significant change to vCenter Server Appliance 6.7 is a simplification of the architecture and a reversion to running all vCenter Server services on a single instance. With the introduction of vCenter Server with embedded Platform Services Controller instance with Enhanced Linked Mode. Pre-Upgrade ConsiderationsFirst when upgrading to the latest version of vSphere you need to know that vSphere 6.7 is not compatible with vSphere 5.5. One requirement for upgrading is to make sure that the vSphere Distributed Switch (VDS) has been upgraded to at least version 6.x. Since there is no upgrade path from 5.5 to 6.7 directly, the upgrade from 5.5 will bring you to 6.x before moving to 6.7. After getting up to vSphere 6.x and before upgrading to vSphere 6.7, you must update the VDS to a 6.x version. In order to upgrade to vSphere 6.7 I always recommend that you get a good understanding of the current state of your virtual infrastructure. This can be accomplished though a VMware Partner like Sirius Computer Solutions. You can also take advantage of free tools like vCheck which can be ran against your virtual infrastructure. You install vCheck onto a Windows system and point it at the vCenter environment you are looking to upgrade. This is not as thorough as a health check from a certified VMware Partner but it is a good step. You can also run RVTools which is another free tool to collect important data on your environment that can be used to assist with an upgrade. Once you find any issues that require remediation, I recommend doing them before proceeding with an upgrade so that you do not carry any underlying issues into your new upgrade environment. Next you want to review the Product Release Notes from VMware. I recommend that you focus on the Compatibility section which will guide you through the compatibility of current and earlier versions of VMware vSphere components, including ESXi, VMware vCenter Server, and optional VMware products. This section will offer information on the following components:
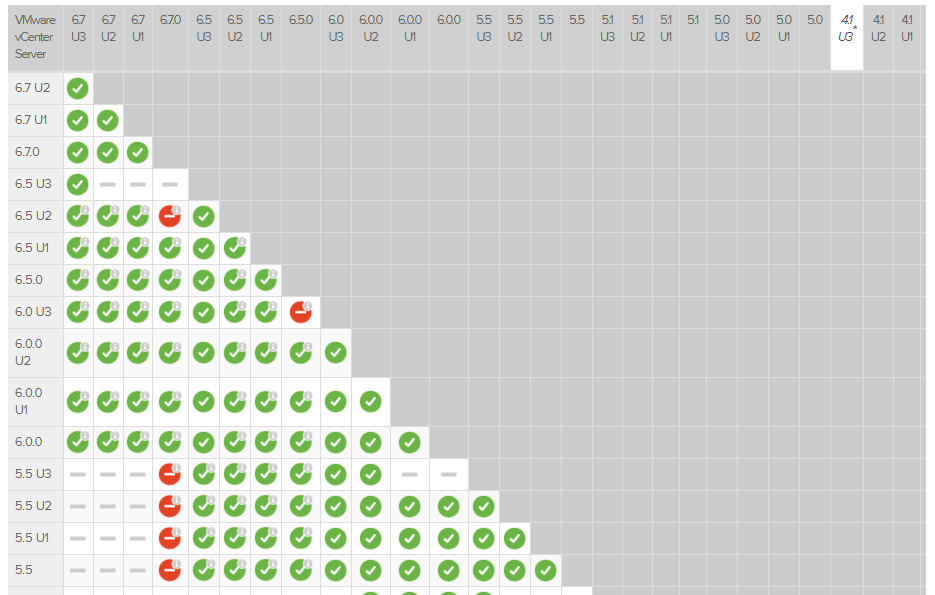
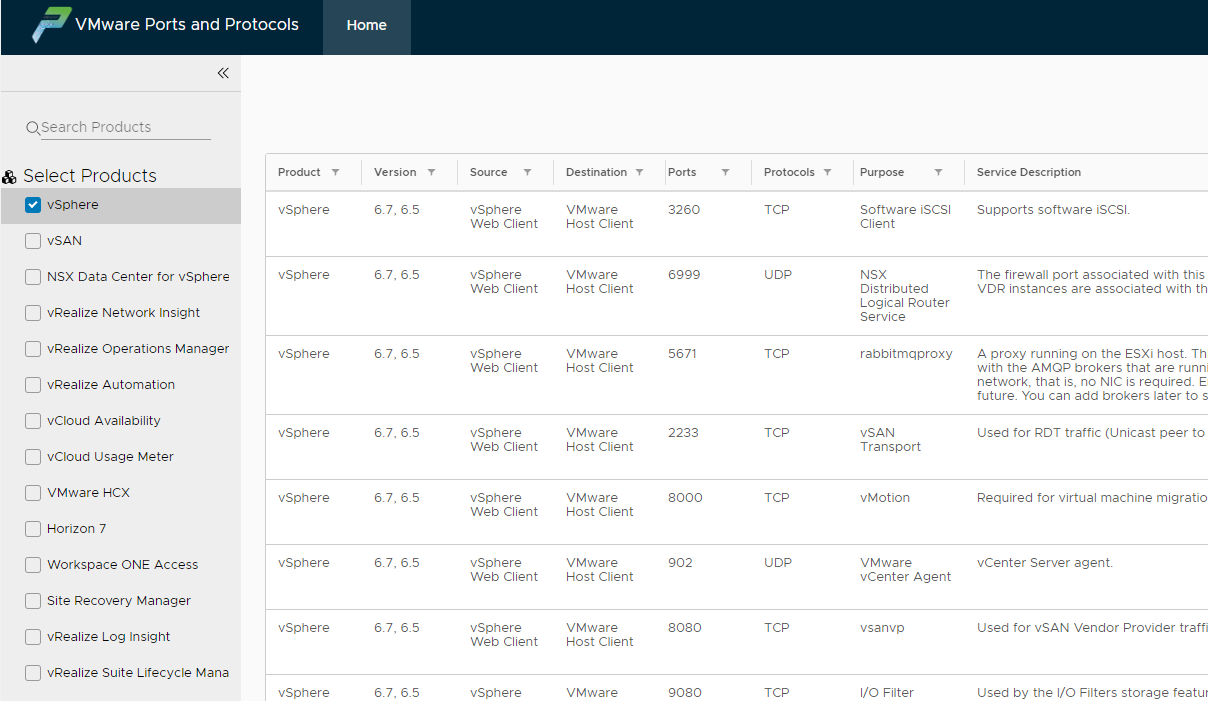
There is also an Upgrade Notes section that I would recommend reviewing for instructions about upgrading ESXi hosts and vCenter Server. Here you can find information on Back-in-Time Upgrade Restrictions which is captured in KB67007. Now that you are thoroughly mind numb from reading all this documentation you really need to take the previously collected virtual environment data you collected above and look at the three vSphere Interoperability Matrices. The first of these is the VMware Product Interoperability. This can be used to look at upgrading other VMware products you might have in your virtual infrastructure and whether they are compatible with the upgrade. The second, pictured above, is the Upgrade Path Interoperability. This Interoperability helps you understand the Back-in-Time restrictions and supported upgrade paths for the different versions of VMware vSphere. The third is the Solution/Database Interoperability. This last interoperability will allow you to look at third party databases for solutions that might depend on these external databases. There is a great KB2006028 that details how to use the VMware Compatibility Guide, to find information on guest/host operating system compatibility and database and VMware product interoperability. If you have multiple VMware products within your virtual infrastructure you will need to upgrade these products in very specific order so that you do not run into issues during the upgrade or later. I would recommend that you review the ports that are required to be opened to support the design of you virtual infrastructure. Thanks to VMware, it is easy to find the list of these from their website on ports, which may be found here. As you can see from the picture above, this will list out ports for all VMware related products like vSAN, vRealize Network Insight, and more. This process can be very time consuming and working in an environment with hundreds of hosts can be very challenging to check the interoperability for each host and product set you are upgrading. There is a new VMware Fling to assist you with this. If you are not familiar with Flings, they are apps and tools built by VMware's engineers and the VMware community to solve tasks like this. Note: that these are not supported by VMware support. The new Fling, Compatibility Checker, will assist with the task of checking comparability matrices against ESXi. The ESXi Compatibility Checker is a python script that can validate VMware hardware compatibility and upgrade issues of ESXi. The Fling can also generate a compatibility report for ESXi and it can be exported to HTML or or CSV file. See the video below for ore detailed information. Another consideration is the vSphere Signing Certificate Expiration. You can find more information on this topic from the VMware blog, here. Upgrade TimeBefore you begin the process of upgrading, the first thing you need to do is to back-up your virtual infrastructure. This is highly important in case you run into issues and need to revert back to a previously known good state. What to back up?
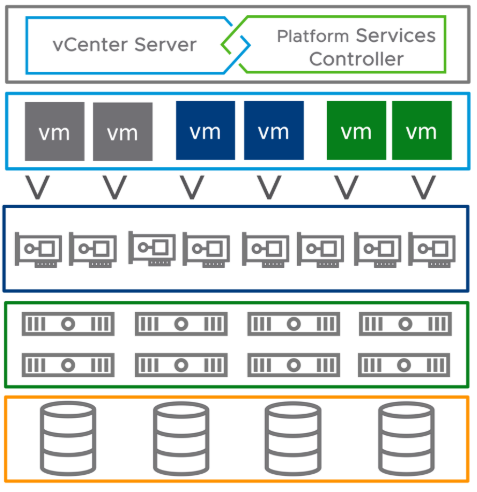
You can also utilize VMware snapshots where it makes sense like when upgrading a vCenter server appliance, however snapshots are NOT backups. Steps to UpgradeStep 1: Platform Service Controller If you have external Platform Service Controllers as pictured above, within a Single Sign-on Domain, you need to upgrade all Platform Service Controllers as your first step in the upgrade process. If you are utilizing VMware Linked-Mode then you must upgrade both sides within a Single Sign-on Domain. Step 2: vCenter Server If you have an Embedded vCenter server, which means that your Platform Service Controller has been installed along with vCenter as an appliance then, step 1 becomes part of steps 2. Note: There is not a supported upgrade from the Windows based vCenter Server to the vCenter Server Appliance unless you decide to use one of the tools mentioned about to assist you. Supported operations for vSphere:
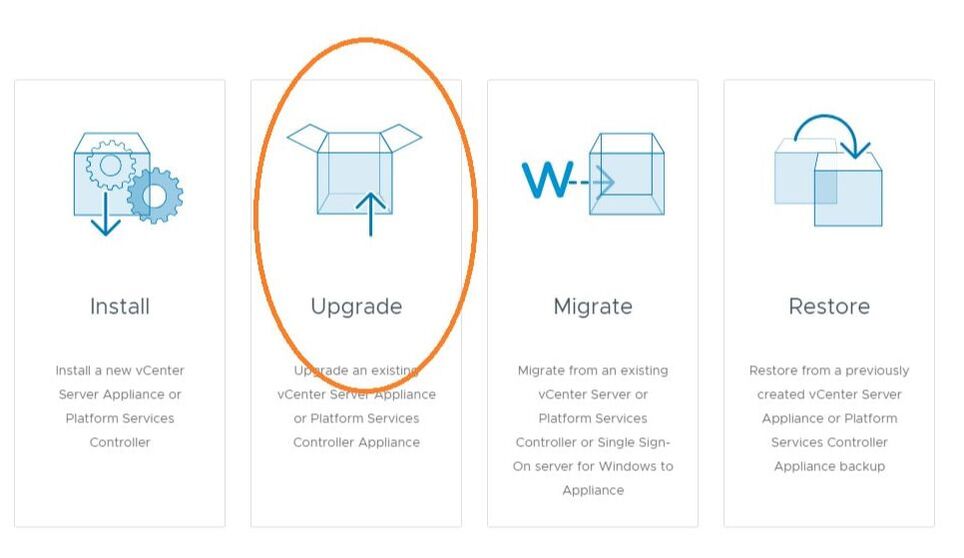
If you need to upgrade multiple vCenter server appliances you can take advantage of the vCenter Server Appliance CLI Installer which will allow you to perform upgrades in a Batch Mode. You have several options when running the new vCenter Server Appliance 6.7 Installer, as you can see from the above picture. In our scenario we are discussing the Upgrade option. You will need to supply the source FQDN or IP Address to your existing vCenter server appliance that you will be migrating from which will connect over port 443. You will then need to fill in the SSO username and SSO password to connect. Next, after accepting the SSL Certificates, you will enter the target ESXi information. Your new vCenter will inherit the existing DNS name and IP address since we are doing an upgrade. You will be prompted for information on the next several screens like:
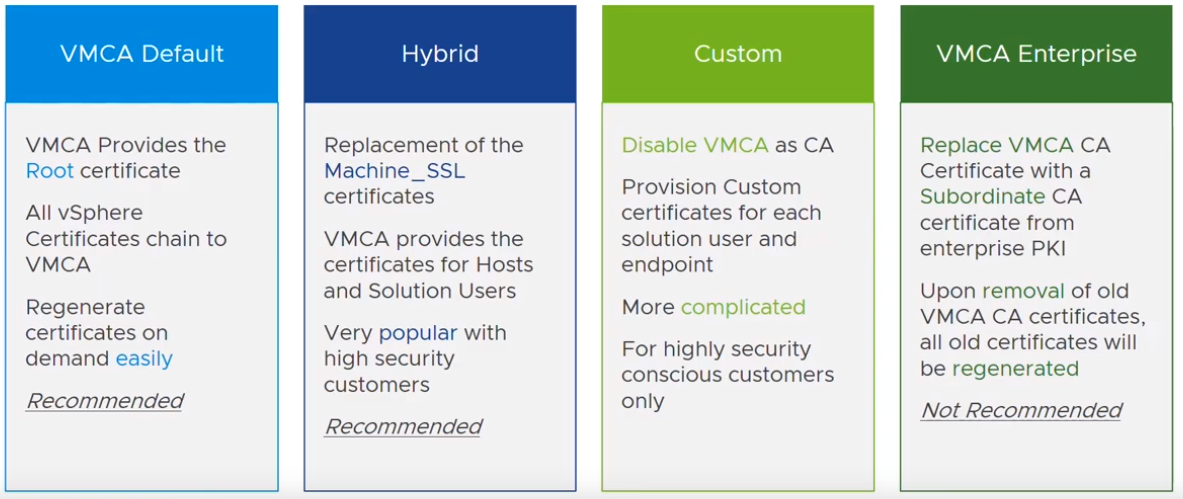
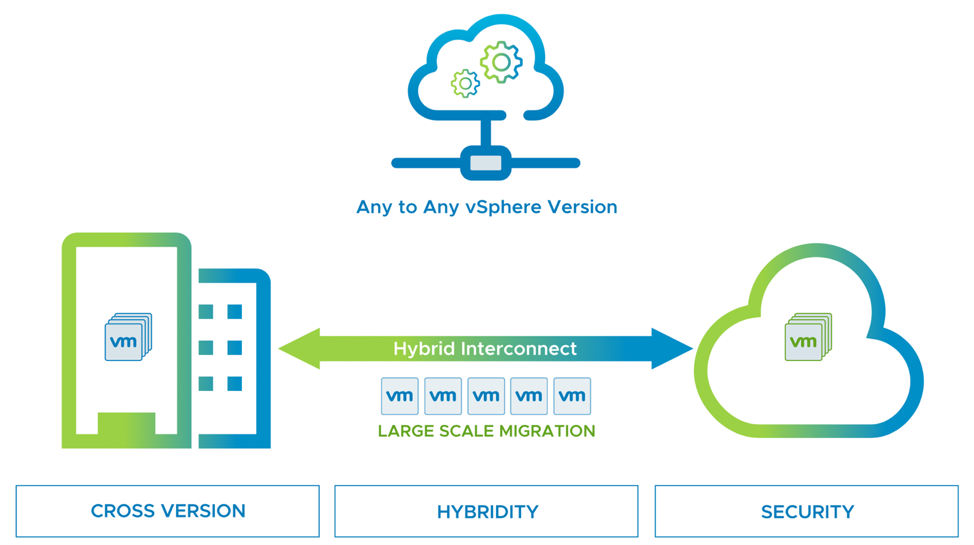
This will begin phase one of the upgrade and then move you into phase two which will take you through a pre-check screen. It is important to take actions on any critical, or warnings found. As discussed earlier you will have a choice to keep historical data or start fresh. VMware recommends that you start fresh. After this you will follow the next few screens and then finish the upgrade at which point you will have a new vCenter server deployed. Step 3: ESXi Hosts The next step in the process is to upgrade all your ESXi hosts and it is recommended to utilize the VMware Update Manager for this process which is part of the vCenter server appliance. First you will need to go to the Update Manger from vCenter, once you log-in. The Update Manger is capable of patching hosts as well as major version upgrades. The host upgrade software is delivered in an ISO image. You will need to add the ISO to VUM by importing it. After the ISO has been imported into the VUM repository, you need to create a new upgrade baseline. Follow the UI instructions for creating this. Once this is created you can go to the baseline tab of the VUM and begin the cluster/host upgrade procedure. It is best if you use the baseline against a configured cluster of ESXi hosts. Next, you will attach the baseline you created and then be prompted to check the cluster compliance to ensure that the individual hosts are in compliance or if they require remediation. A remediation pre-check for AppServices will run next and check to see if DRS is enabled so that running VMs can be migrated with zero-downtime across the cluster. It will also check the status of HA. At this point you will need to review the settings and begin the upgrade process. During this process hosts are placed into maintenance mode and the running VMs are migrated until the entire cluster is upgraded. You can also use Auto Deploy as anther method to upgrade the hosts. vSphere Auto Deploy uses PXE boot infrastructure in conjunction with vSphere host profiles to provision and customize that host. No state is stored on the host itself. Instead, the vSphere Auto Deploy server manages state information for each host. Step 4: VM Tools & VM Compatibility Running the latest versions of VMware Tools in the guest operating system allows it to take advantage of the latest features of vSphere. Note: For Linux Guest Operating Systems VMware Tools 10.3.5 was the final feature release to include OS Specific Packages (OSPs) and TAR tools for legacy Linux distributions. VMware recommends upgrading to 10.3.10 for the security updates to the open source components for these distros. More modern Linux Operating Systems should continue to use open-vm-tools, which is available through your OS package manager. There are two ways to upgrade VMware Tools, manually or automatic. Updating Tools may require a reboot so plan accordingly and you must upgrade the VMware Tools before upgrading the Virtual Machine Compatibility. Virtual Machine Compatibility corresponds to the physical underlying hardware of the vSphere host. Upgrading this will allow the VM to take advantage of the additional hardware features available to the VM. In vSphere 6.7, Virtual Compatibility version 14 was introduced and includes support for features addressed earlier, like Per-VM EVC, Virtual TPM 2.0, and Microsoft Virtualization Based Security (VBS). You should only upgrade to this latest version if you require to take advantage of these new features. Otherwise version 11 is sufficient. Step 5: Storage - VMFS & vSAN You cannot upgrade a VMFS5 datastore to VMFS6. If you have a VMFS5 datastore in your environment, create a VMFS6 datastore and migrate virtual machines from the VMFS5 datastore to VMFS6. Note: ESXi no longer supports VMFS3 datastores. There are several reasons why you need to upgrade to this latest version. The first of these being the Automatic Space Reclamation (ASR) feature which allows storage arrays to reclaim deleted or unmapped disk blocks from a VMFS datastore so they can be used elsewhere. See the Resource section below for links to more information on these subjects. Step 6: Virtual Distributed Switch You can upgrade vSphere Distributed Switch version 6.x to a later version. The upgrade lets the distributed switch take advantage of features that are available only in the later version. See the Resource section below for links to more information on upgrading. Step 6: Certificates After all the upgrades have been completed you may be required to update your certificates within your virtual infrastructure. The recommended default way to manage certificates is through the VMCA which allows the Platform Services Controller to be the root certificate authority. As you can see from the above picture, there are other ways to manage your certifications in hybrid model, custom, and Enterprise. See the Resource section below for more information on this subject. VMware HCXAnother great tool that can be used to assist migrating from older VMware vSphere versions, that are no longer supported, like vSphere 5.0, I bring you VMware HCX. VMware HCX is an application mobility platform designed for simplifying application migration, re-balancing workloads, and optimizing disaster recovery across data centers and clouds. Benefits:
Resources
1 Comment
8/27/2020 09:06:58 pm
This is a great addition tips blog on automatically create measures in power bi using vs code, thank you for sharing this article. I love it how you have written the insightful, all these kind of information is wonderful and great for us.
Reply
Your comment will be posted after it is approved.
Leave a Reply. |
RecognitionCategories
All
Archives
April 2024
|
 RSS Feed